Many systems work with CSV data in a hierarchical structure, this is where parent data is followed in the file by its child data before the next parent item, for example customer, order and item data would be defined within the file something like:
CustomerName, CustomerAccount
OrderID, OrderData
Product Code, Description, Price, Quantity
The hierarchical data structure could look something like:
John Smith, JSMITH1
23, 26/08/2010
WID1, Widget One, 23.86, 2
WID2, Widget Two, 34.12, 1
45, 12/03/2011
WID23, Widget 23, 19, 5
4, Dave White, DWHITE1
739, 26/08/2011
WID1, Widget One, 23.86, 3
In the file it would look like:
John Smith, JSMITH1
23, 26/08/2010
WID1, Widget One, 23.86, 2
WID2, Widget Two, 34.12, 1
45, 12/03/2011
WID23, Widget 23, 19, 5
Dave White, DWHITE1
739, 26/08/2011
WID1, Widget One, 23.86, 3
Often each line is preceded with a flag indicating whether its a customer, order or item row, for example the below example uses C, O or I as a flag.
C, John Smith, JSMITH1
O, 23, 26/08/2010
I, WID1, Widget One, 23.86, 2
I, WID2, Widget Two, 34.12, 1
O, 45, 12/03/2011
I, WID23, Widget 23, 19, 5
C, Dave White, DWHITE1
O, 739, 26/08/2011
I, WID1, Widget One, 23.86, 3
Exporter can be used to create this type of file, the following is a simple walk through showing how you would create the CSV structure outlined above.
This walkthough assumes your already familiar with setting up a basic job, if not try completing the Define Your First Job walk through first.
Begin by creating a new job and choose CSV File as the export to option.
Select the following table & columns to export from sage
Customers
ACCOUNT_REF
CONTACT_NAME
Invoices
ACCOUNT_REF
INVOICE_NUMBER
INVOICE_DATE
Invoice Items
INVOICE_NUMBER
DESCRIPTION
STOCK_CODE
QUANTITY
UNIT_PRICE
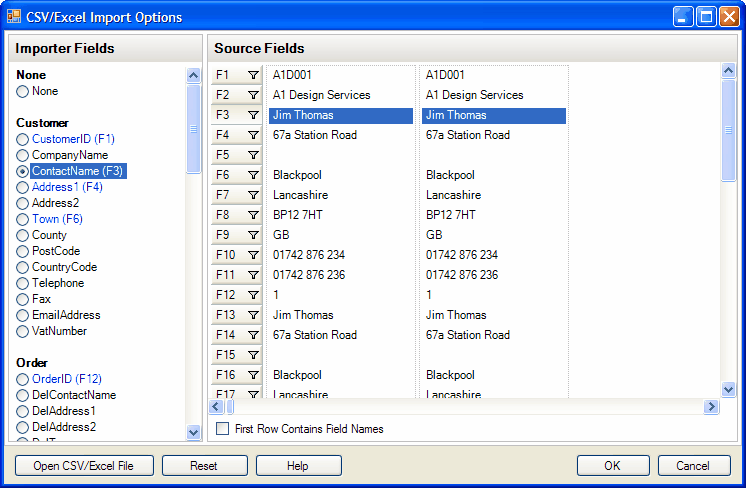
Once done your export options dialog should look like the image below.
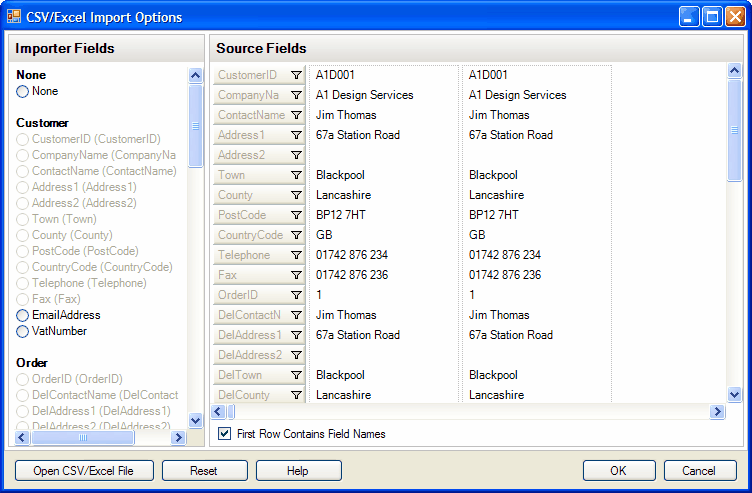
Next click the relationships button and set-up the relations as the image below, for a detail explanation of relations see Relational Data
Next move onto the CSV options dialog and set it up as per the image below, for a detail explanation of the CSV options see CSV
If you now finish the job editor and run an export you will find the file has exported the data in a hierarchal format.
Earlier we mentioned that some systems expect a flag at the beginning of each line to indicate what it represents, for example C for customer, O for order and I for item, do do this edit your job and go to the field selection dialog for the customers table shown below:
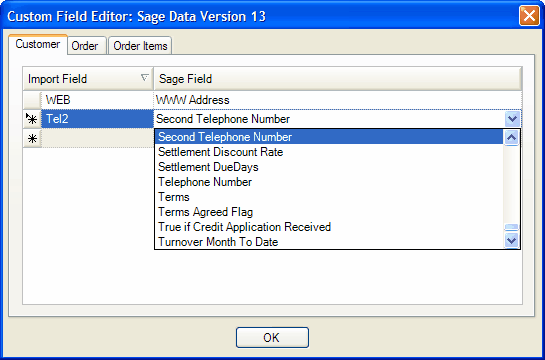
Click the Custom Fields button and define a custom field as per the image below, for more on custom fields see Custom Fields
Now you have added a custom field you need to edit the column order so you can ensure the custom field is the first field in the CSV row, do this by clicking the Column Order button on the field selection dialog and setting up the column order as per the image below. for more on ordering columns see Define Column Orders
You order columns by selecting a item in the list and using the slider on the left to move the item up or down the list.
That's it, now if you run an export your will find each customer row in the CSV file will be preceded with a C,
You can repeat the previously steps on the Invoices & Invoice Items tables to add the O & I prefixes to complete the example.