You can define a job that is stored saving you from having to repeatedly input common data continually, You can have as many jobs as you like, the screen shots below shows the various job editor screens.
General Settings

The general setting screen has the following settings that can be edited:
Job Name: use this to give the job a descriptive name.
Connection: Select a sage connection you want this job to use.
Add/Update Rule: choose from the following options:
Add And Update: |
new products will be added and existing product updated as appropriate. |
Add Only: |
product will only be added, existing product will be left alone. |
Update Only: |
existing product will be updated as appropriate, no new product will be added. |
Match Product By: You can match up imported products to existing sage products on either the Stock Code or Suppliers Part Number, choose from the following options:
Stock Code: |
Matches imported products to existing sage products by comparing the imported stock code to the sage stock code. |
Supplier Part Number: |
Matches imported products to existing sage products by comparing the imported suppliers part number to the sage Part No field. |
Stock Code Prefix/Suffix: When Match Products By is set to Suppler Part Number and no stock code is provided in the import file it may be necessary to create a stock code, by default the imported supplier part numbers is used, you can add a prefix and/or suffix value to this.
First Row Contains Field Names: use this to indicate whether the files you will be importing for this job will include column names in the first row, Product Importer needs to know this so it knows the first row of your file will not contain product information
Default Values (Dependant on Add/Update Rule selection)
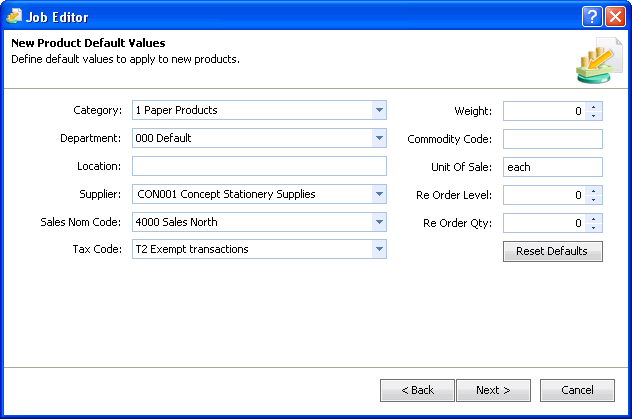
The default values screen allows you to pre-define common values to use when adding new products, these field are populated with the appropriate values taken from sage, you can still change these values on a product by product basis in the main interface if required.
Custom Default Values (Dependant on Add/Update Rule selection)
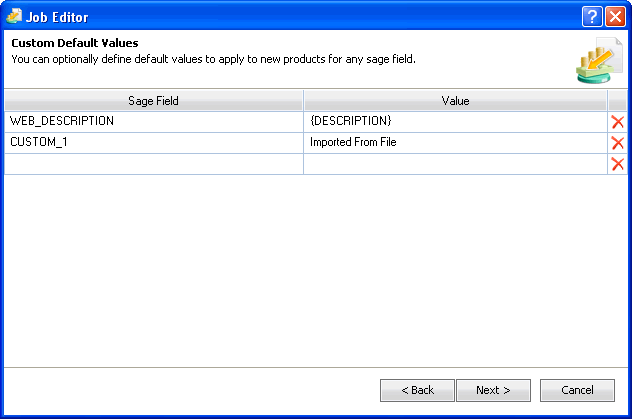
The custom default values screen allows you to pre-define default values for fields not made available on the default values screen, again these values only apply to new products being added to sage and can be change on a product by product basis in the main interface.
You can simply input a hard value or you can input an expression that can be used to pull data from other fields on the record to create the required value, the above screen shot shows both, the CUSTOM_1 field is being given a default value of "Imported From File", the WEB_DESCRIPTION field is using an expression to copy the value from the DESCRIPTION field.
When using expressions you can build a value from as many different fields as you like with the only limitation being those fields must exist as either a mapped field or are one of the standard default value fields.
Example:
{STOCK_CODE}'s Category={STOCK_CAT}
would give a runtime value something like:
TEST1's Category=45